Installing Talos Kubernetes on Proxmox: A Complete Guide
Learn why Talos is the best OS for running Kubernetes, how it compares to alternatives, and follow a complete guide to setting up a production-grade cluster with Cilium CNI on Proxmox.
Installing Talos Kubernetes on Proxmox: A Complete Guide
Talos is an immutable operating system designed specifically for Kubernetes. In this guide, I’ll walk you through setting up a minimal Kubernetes cluster on Proxmox, from VM creation to CNI customization with Cilium.
🤔 What is Talos?
Talos Linux is a modern, secure, and minimal operating system designed from the ground up to run Kubernetes. Unlike traditional Linux distributions that were retrofitted for containerization, Talos is purpose-built with a single goal: to be the best platform for running Kubernetes clusters.
Key Characteristics
-
Immutable Infrastructure: The entire OS runs from a SquashFS image in memory. No SSH, no shell access by default, no package manager. This isn’t a limitation—it’s a feature that dramatically reduces the attack surface.
-
API-Driven Management: Everything is configured via a gRPC API using
talosctl. No manual file editing on nodes, no configuration drift. -
Minimal Attack Surface: Talos runs only what’s absolutely necessary for Kubernetes. No unnecessary services, no legacy baggage, no potential security vulnerabilities from unused components.
-
Ephemeral Nodes: Since nodes are stateless and configuration is declarative, you can destroy and recreate them at will without losing your cluster state.
🎯 Why Choose Talos Over Traditional Kubernetes Setups?
When I started exploring different ways to run Kubernetes in my homelab, I evaluated several approaches:
The Alternatives
1. kubeadm on Ubuntu/Debian
- ✅ Well-documented and widely used
- ❌ Requires managing the underlying OS
- ❌ Potential for configuration drift
- ❌ More attack surface (SSH, package managers, etc.)
- ❌ Manual security hardening needed
2. k3s
- ✅ Lightweight and easy to set up
- ✅ Great for edge and IoT scenarios
- ❌ Still requires managing the host OS
- ❌ Some non-standard Kubernetes components
3. Rancher RKE/RKE2
- ✅ Enterprise-grade features
- ✅ Good management UI
- ❌ More complex setup
- ❌ Still requires OS management
4. MicroK8s
- ✅ Simple snap-based installation
- ✅ Good for development
- ❌ Ubuntu-specific
- ❌ Snap overhead
Why I Chose Talos
After experimenting with all of these, Talos stood out for several reasons:
-
Zero Configuration Drift: With an immutable OS, what you deploy is what you get. Every time.
-
Security by Default: No SSH means no unauthorized access. No package manager means no supply chain attacks through backdoored packages. The minimal design philosophy means fewer CVEs to worry about.
-
True Infrastructure as Code: Your entire cluster configuration is versioned YAML files. Want to spin up an identical cluster? Just apply the same configs.
-
Upgrade Simplicity: Upgrading the OS is atomic and safe. Rollbacks are straightforward. No worrying about “yum update” breaking your production cluster.
-
Perfect for Homelabs: For learning and experimentation, Talos forces you to think in cloud-native patterns. You can’t SSH in and manually fix things—you have to learn the proper way.
🔧 Preparation
Before we begin, you’ll need:
- A system to host the VMs (in this case, Proxmox)
- Install
talosctlusing the following command:brew install siderolabs/tap/talosctl
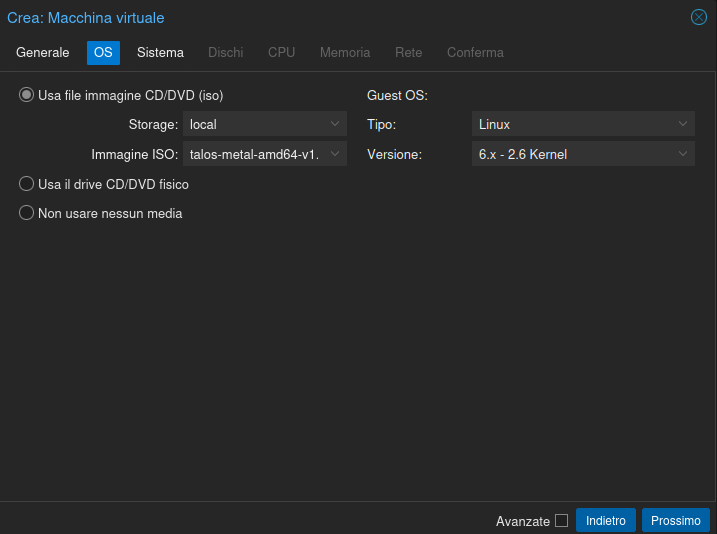
🖥️ Creating Virtual Machines
The first step for a minimal installation is creating two virtual machines: one for the worker and one for the control plane.
Let’s download the latest available image. In my case, I used talos-metal-amd64-v1.12.0.iso and set it as the ISO.
Once created (at least on Proxmox), start both VMs.
Wait until both VMs are in Maintenance state:
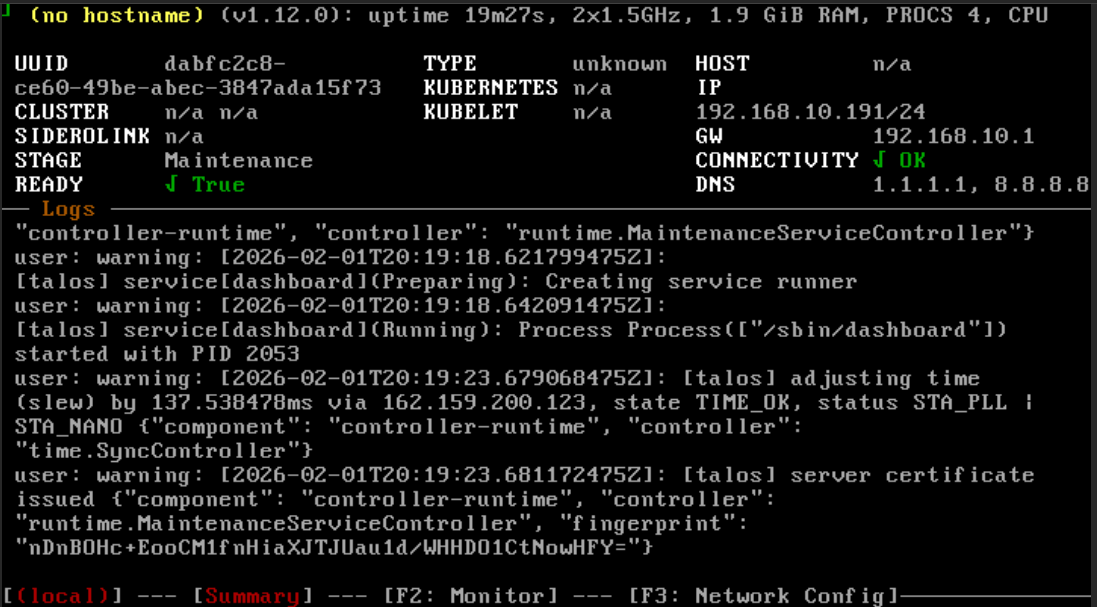
This means Talos is ready to receive installation instructions. Now, navigate to a folder that will contain the Talos configuration files and proceed with the actual installation.
⚙️ Generating Configuration Files
First, generate the talosconfig using the command:
talosctl gen config <cluster-name> <cluster-endpoint>In my case, I positioned myself in my home directory and created a folder called talos-config, then executed the specific command:
talosctl gen config homelab-cluster-trial https://192.168.10.191:6443This will produce the following result:

If we cat the talosconfig file, we’ll see that the certificates for the cluster we’re about to configure have been saved.
⚠️ Warning: If this file is lost, you’ll need to reset the cluster for future
talosctlcommands.
The controlplane.yaml and worker.yaml files contain the base configurations for the nodes. It’s possible to make cluster modifications either at this stage by editing them, or later by applying patches.
For cleaner workflow, we’ll apply patches later.
🚀 Applying Configurations
Now, let’s apply the two YAML files to the previously created nodes using the command:
talosctl apply-config --insecure -n 192.168.10.191 --file controlplane.yamlLooking at the machine console, you’ll see something happening with a screen similar to this while Talos is being installed:
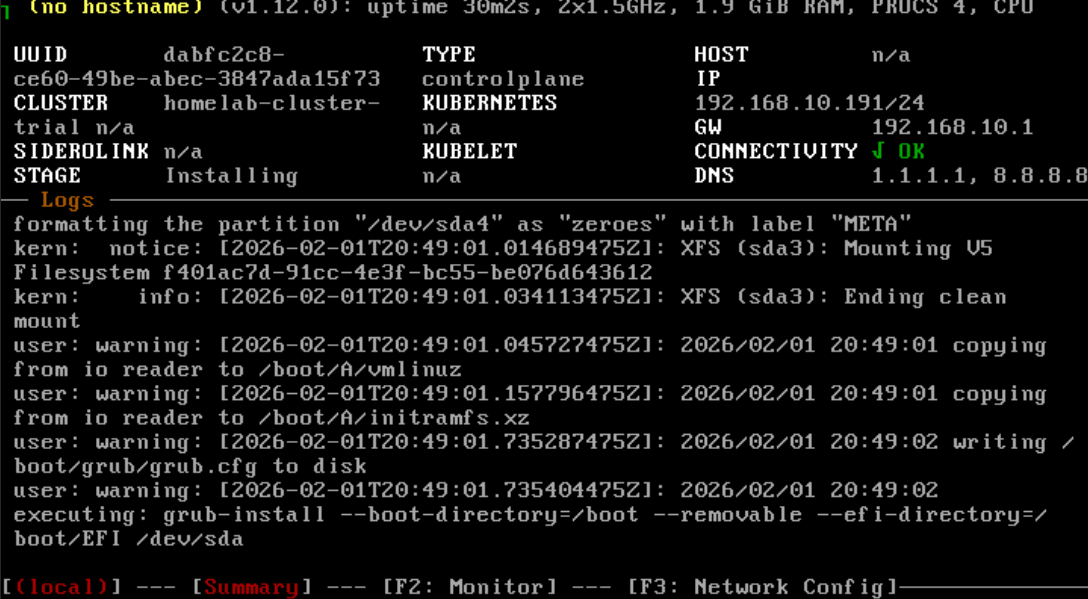
After the Installing phase, the control plane will enter the Booting phase:

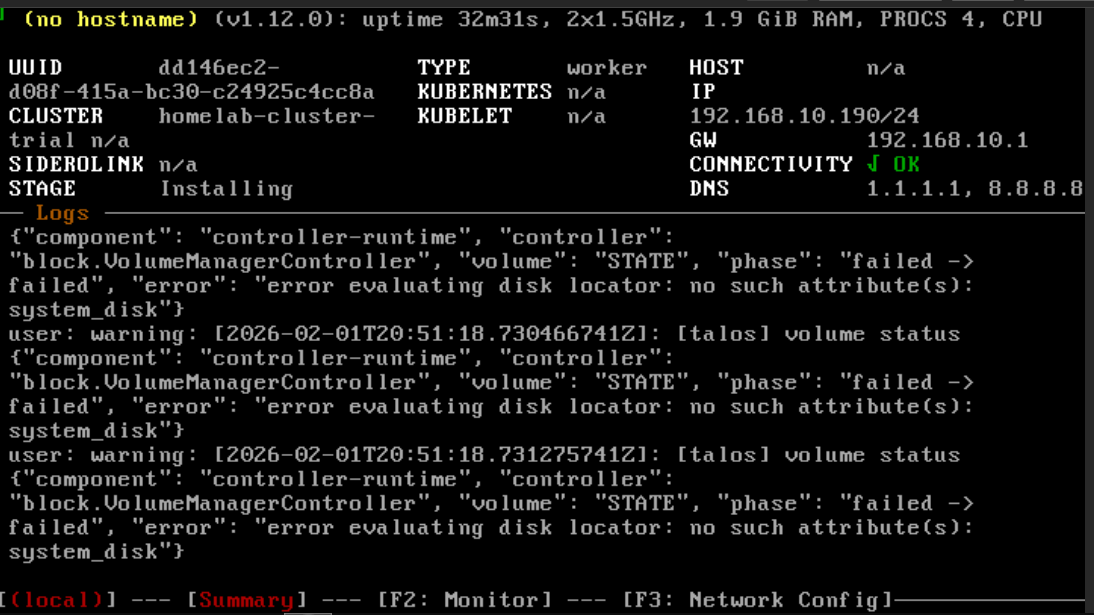
Once we reach this point, execute the command for the worker:
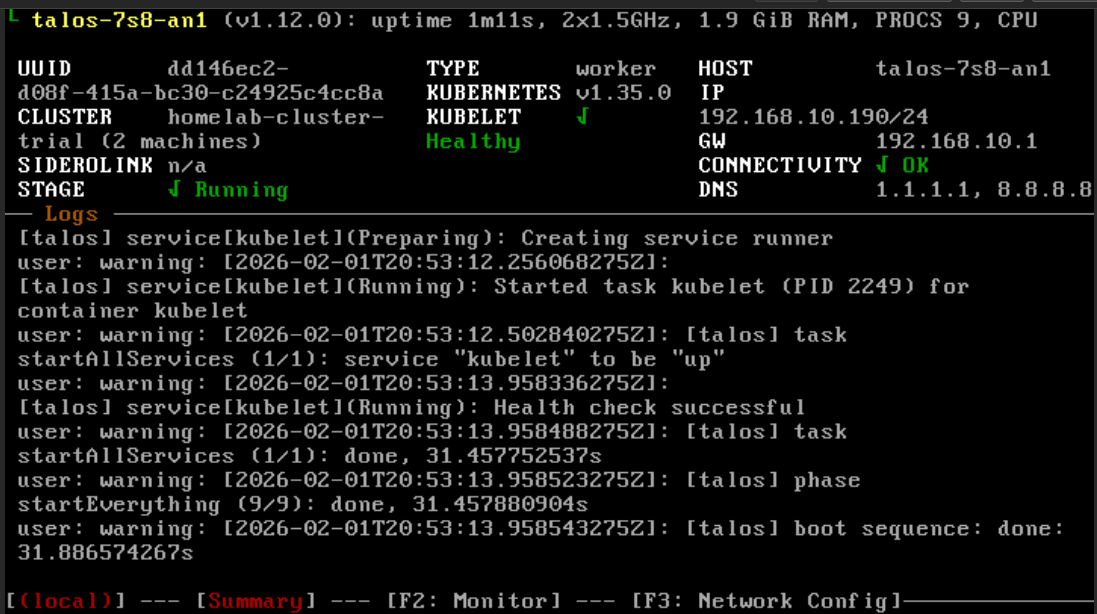
talosctl apply-config --insecure -n 192.168.10.190 --file worker.yamlInitially, you’ll have a similar situation:
And once the installation is complete, you’ll see this screen:
🔗 Configuring Endpoints
Now we need to tell talosctl about the cluster endpoint addresses and the nodes. Execute the following commands:
talosctl config endpoint <CONTROLPLANE_IP>
talosctl config node <CONTROLPLANE_IP> <WORKER1_IP>
In our case:
talosctl config endpoint 192.168.10.191
talosctl config node 192.168.10.191 192.168.10.190
To verify everything is correct, run:
talosctl config infoThis will give you something like:
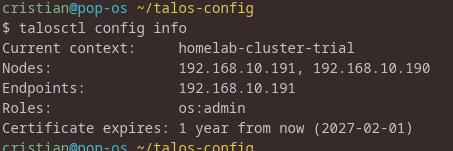
🎯 Bootstrapping the Cluster
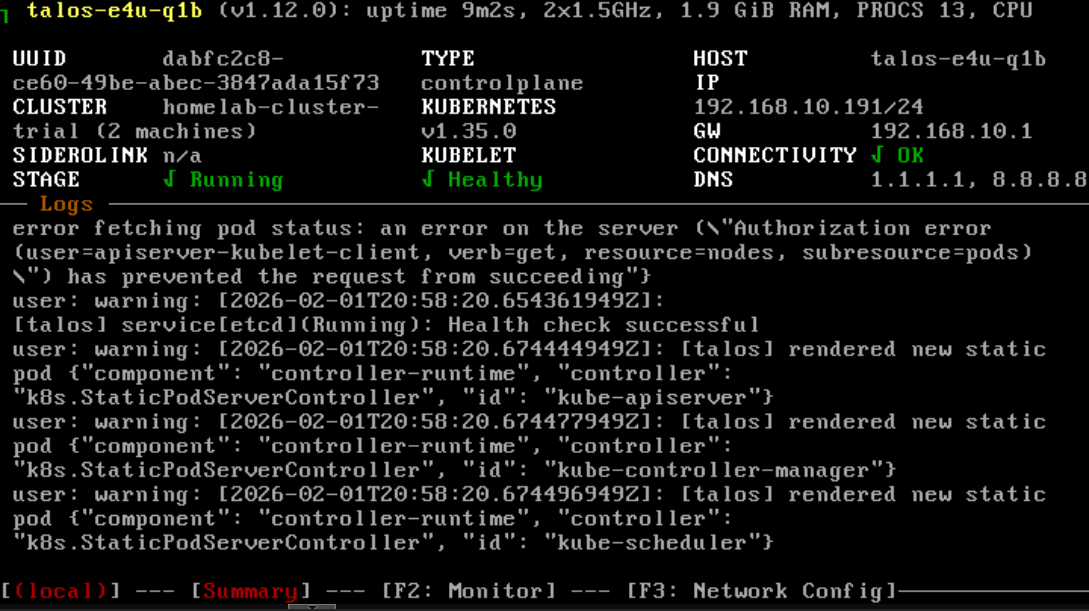
Everything is ready now. Launch the bootstrap command:
talosctl bootstrap -n 192.168.10.191And our control plane will be in a correct state:
Now verify everything by adding the newly created context to kubeconfig:
talosctl -n 192.168.10.191 kubeconfig ~/.kube/configAnd perform a simple kubectl get all -A:
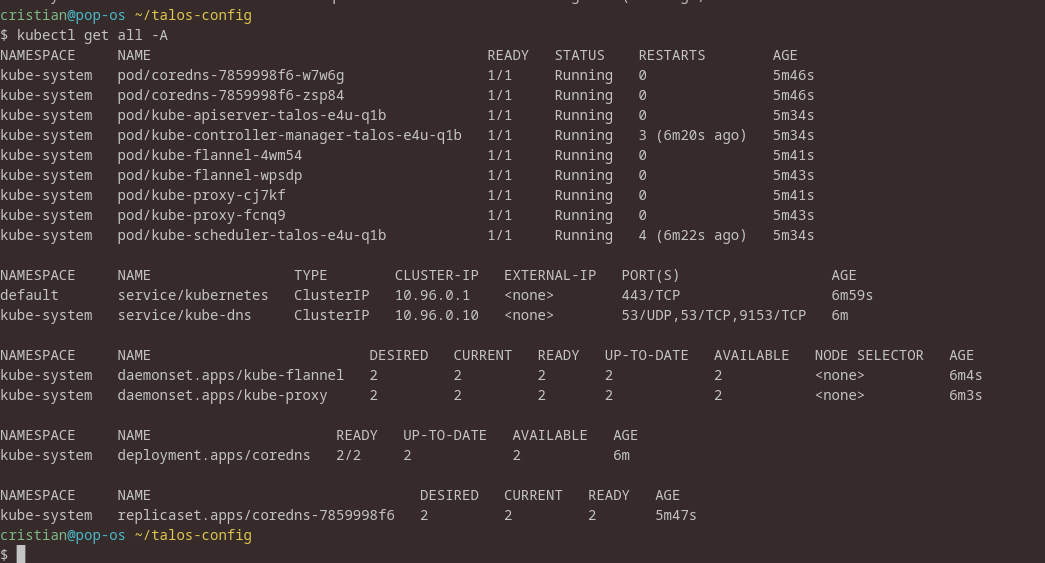
Now shut down the VMs and remove the ISOs so the system boots from disk (on Proxmox, after shutting down, perform a detach).
Once everything is restarted, run any control command again, and voilà — we’ve installed a very simple Kubernetes cluster with Talos!
🌐 Choosing the Right CNI: Why Cilium?
We could conclude here with a working Kubernetes cluster using the default Flannel CNI, but let me explain why I prefer Cilium and why you might want to consider it too.
Understanding CNI Options
A Container Network Interface (CNI) plugin is responsible for network connectivity between pods in your Kubernetes cluster. Here are the main options:
1. Flannel (Default in Talos)
- ✅ Simple and stable
- ✅ Works out of the box
- ❌ Limited features
- ❌ No network policies
- ❌ No advanced observability
2. Calico
- ✅ Robust network policies
- ✅ BGP support
- ✅ Mature and well-tested
- ❌ More complex setup
- ❌ Higher resource usage
3. Weave Net
- ✅ Easy encryption
- ✅ Multicast support
- ❌ Performance limitations
- ❌ Less active development
4. Cilium
- ✅ eBPF-based (modern Linux kernel feature)
- ✅ Superior performance
- ✅ Advanced network policies (L7, DNS, HTTP)
- ✅ Built-in observability (Hubble)
- ✅ Service mesh capabilities
- ✅ Can replace kube-proxy
- ❌ Requires newer kernel (which Talos provides)
Why Cilium for This Setup?
For a homelab focused on learning and modern cloud-native practices, Cilium is the perfect choice:
-
eBPF Technology: Learn the technology that’s powering the future of networking, observability, and security in Linux.
-
kube-proxy Replacement: Cilium can completely replace kube-proxy with a more efficient eBPF implementation, reducing overhead.
-
Observability: Hubble provides incredible insights into your network traffic without any instrumentation of your applications.
-
Learning Opportunity: Understanding Cilium’s network policies prepares you for real-world security requirements.
-
Talos Compatibility: Talos’s modern kernel is perfect for Cilium’s eBPF requirements.
Now, let’s implement this upgrade!
🔄 Switching to Cilium CNI
Since Talos is an immutable OS, we need to apply a patch by creating a patch.yaml file with this content:
cluster:
  network:
    cni:
      name: none

  proxy:
    disabled: true
And execute it for all nodes:
talosctl apply-config -n <CONTROLPLANE_IP> \
--file controlplane.yaml \
--config-patch @patches/disable-cni-and-kube-proxy.yaml
talosctl apply-config -n <WORKER_IP> \
--file worker.yaml \
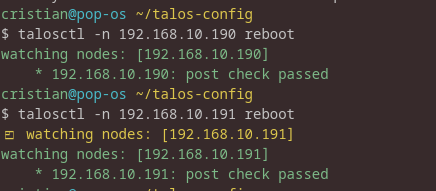
--config-patch @patches/disable-cni-and-kube-proxy.yaml At this point, the nodes won’t reboot automatically and the changes won’t be applied automatically (although I often find it written that they will — might be my issue), so perform the reboot with the commands:
talosctl -n <WORKER_IP> reboot
talosctl -n <CONTROL_PLANE_IP> reboot
Initially, you’ll see red output, but this indicates it’s rebooting.
With a clean situation, we’ll get:
We’ll still have Flannel installed since we need to remove the existing pods and DaemonSets.
Removing Flannel
First, verify:
kubectl -n kube-system get ds | grep -i flannel
kubectl -n kube-system get pods | grep -i flannel
kubectl get clusterrole,clusterrolebinding | grep -i flannel
kubectl -n kube-system get sa | grep -i flannel
kubectl -n kube-system get cm | grep -i flannel
Then delete everything:
kubectl -n kube-system delete ds kube-flannel
kubectl -n kube-system delete sa flannel
kubectl delete clusterrolebinding flannel
kubectl delete clusterrole flannel
kubectl -n kube-system delete cm kube-flannel-cfg --ignore-not-found
kubectl -n kube-system delete ds kube-proxy
kubectl -n kube-system delete cm kube-proxy --ignore-not-found
We should find ourselves in this situation:

Installing Cilium
Now let’s install Cilium by executing the following commands:
helm repo add cilium https://helm.cilium.io/
helm repo update

helm install cilium cilium/cilium \
  --namespace kube-system \
  --set ipam.mode=kubernetes \
  --set kubeProxyReplacement=true \
  --set securityContext.capabilities.ciliumAgent="{CHOWN,KILL,NET_ADMIN,NET_RAW,IPC_LOCK,SYS_ADMIN,SYS_RESOURCE,DAC_OVERRIDE,FOWNER,SETGID,SETUID}" \
  --set securityContext.capabilities.cleanCiliumState="{NET_ADMIN,SYS_ADMIN,SYS_RESOURCE}" \
  --set cgroup.autoMount.enabled=false \
  --set cgroup.hostRoot=/sys/fs/cgroup \
  --set k8sServiceHost=192.168.10.191 \
  --set k8sServicePort=6443
📝 Note: The security context settings are essential for proper Cilium installation in a Talos environment.
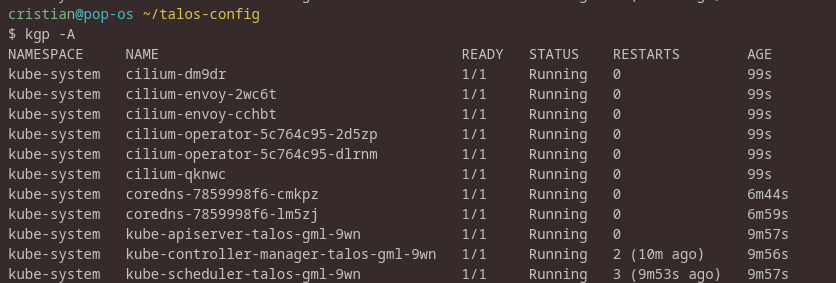
Running kubectl get pods -A now, wait for the Cilium pods to finish installing:
✅ Conclusion
Congratulations! You’ve successfully set up a modern, production-grade Kubernetes cluster using Talos and Cilium.
What We’ve Accomplished
- ✅ Deployed an immutable, secure Kubernetes OS that follows cloud-native best practices
- ✅ Built a minimal cluster that’s perfect for learning and experimentation
- ✅ Implemented eBPF-based networking with Cilium for superior performance
- ✅ Configured everything declaratively with Infrastructure as Code principles
- ✅ Eliminated kube-proxy overhead with Cilium’s native implementation
Key Takeaways
Security: With no SSH access and an immutable OS, your cluster’s attack surface is minimal. Every change is auditable and version-controlled.
Simplicity: Despite using cutting-edge technology, the setup is surprisingly straightforward. Talos’s API-driven approach eliminates much of the complexity of traditional Kubernetes installations.
Learning Value: This setup exposes you to:
- Modern immutable infrastructure patterns
- eBPF technology (the future of Linux networking)
- Declarative cluster management
- Cloud-native security practices
Next Steps
Now that you have a working cluster, here are some ideas to explore:
- Deploy Hubble UI to visualize your network traffic
- Experiment with Cilium Network Policies to secure pod-to-pod communication
- Add more nodes to test cluster scaling
- Set up GitOps with Flux or ArgoCD for declarative application deployment
- Configure persistent storage for stateful applications
- Implement monitoring with Prometheus and Grafana
Resources
This setup provides an excellent foundation for learning Kubernetes, testing applications, and experimenting with cloud-native technologies—all within the safety of your homelab.
Feel free to reach out if you have any questions or want to discuss your own Talos experiences!
Related Articles

Building My Homelab: From Failed Attempts to a Solid Proxmox Setup
December 28, 2025
After years of failed attempts, I finally built a stable homelab using Proxmox, LXC containers, and proper architectural decisions. Here's my journey from chaos to a manageable self-hosted infrastructure.

Azure MCP + EntraAware: Integrating MCP Servers with GitHub Copilot in Visual Studio Code
March 5, 2026
How I combined Azure MCP and EntraAware MCP servers with a custom GitHub Copilot agent in Visual Studio Code to handle Azure auditing tasks in natural language, turning hours of portal navigation into a simple conversation.
Protecting Development Showcases with Authelia and Caddy
March 4, 2026
How I used Authelia and Caddy to protect client development showcases from accidental indexing and unauthorized access — after learning the hard way.
Contact Me
Have questions or want to collaborate? Send me a message!