Building My Homelab: From Failed Attempts to a Solid Proxmox Setup
After years of failed attempts, I finally built a stable homelab using Proxmox, LXC containers, and proper architectural decisions. Here's my journey from chaos to a manageable self-hosted infrastructure.
Building My Homelab: From Failed Attempts to a Solid Proxmox Setup
I had been trying to set up my own homelab for a long time, wanting both a private environment to host certain applications on my own hardware and a sandbox to practice various concepts I wasn’t familiar with. The problem I always had? The lack of a clear strategy on how to set things up.
🚫 The Failed Attempts: Learning What NOT to Do
First Attempt: Ubuntu Desktop (The Chaos Era)
I remember my first attempt: I used a PC with Ubuntu (not server, desktop edition) and installed applications directly on the operating system.
This was a long time ago, and I didn’t have the knowledge or ability to understand infrastructures like I do now.
The result? Inevitable instability:
- Different prerequisite versions conflicting with each other
- Tons of folders for every product under
/opt - Complete shutdown when the host went down
- Impossible to maintain or scale
The pattern: It lasted just long enough to do the initial configurations, then I’d abandon it.
And I didn’t try this just once. I tried several times, each ending in frustration.
The Breaking Point
After multiple failed attempts and years of abandoning the idea, I spotted a mini PC on my desk — another failed homelab attempt — and had an epiphany.
The realization: With the new knowledge I’d gained from work, I was probably now capable of building a manageable homelab, usable as a sandbox, and pleasant to use.
💡 The Right Foundation: Choosing Proxmox
The first thing was identifying the operating system to start from. This time, I didn’t get fooled.
I immediately went with Proxmox.
Why Proxmox (And My WiFi Disaster)
I had tried Proxmox in the past but had to give up because I don’t have ethernet cables near my desk. So I tried to set everything up via WiFi.
Let’s just say that after a couple of days, I abandoned everything.
Lesson learned: Don’t try to run Proxmox over WiFi. Just don’t.
The Actual Setup (That Worked!)
This time I decided to:
- Move the mini PC next to a router
- Relocate my entire workspace temporarily
- Do the configuration properly
I connected to my Starlink router, launched the installation, and voilà! I don’t even know why I was so stubborn about the WiFi configuration.
In 10 minutes I was operational!
I navigated from the browser to the proposed address, and magic! I accessed the Proxmox interface.
🏗️ Building the Core Infrastructure
At this point, I decided on two main things to centralize network management:
1. Caddy for Reverse Proxy
I created an LXC container running Caddy.
I chose Caddy over Nginx for simplicity of configuration and maintenance. There are certainly better solutions, but I had confidence with Caddy, so it’s my current choice (which might change in the future).
2. Pi-hole for DNS Management
The second LXC container runs Pi-hole.
Beyond its functionality for blocking ads and trackers at the DNS level, it allows me to easily insert entries into local DNS.
The Magic: FQDNs Instead of IP Addresses
Once I set Pi-hole as the primary DNS on my router, my homelab was no longer composed of meaningless IP addresses but clear FQDNs (Fully Qualified Domain Names).
These FQDNs are then translated by Caddy to the correct addresses.
The difference: Instead of accessing
http://192.168.1.150:8080, I now accessservice.homelab.local
🎯 The Game-Changer: LXC Containers Everywhere
At this point, I already had something much more advanced than my previous experiences.
But the architectural choice that completely transformed my homelab compared to past attempts was: using LXC containers everywhere.
Evolution of My Container Strategy
Initially: I chose community installations from Proxmox scripts.
Currently: I’m preferring to use LXC containers with a base Debian installation and then configure Docker Compose.
Why This Approach Works
Thanks to the Proxmox + containerization combination, I finally have a solid foundation to work on:
| Benefit | Description |
|---|---|
| Isolation | Each service runs in its own container |
| Snapshots | Easy backup and rollback capabilities |
| Resource Control | Precise CPU and memory allocation |
| Easy Migration | Move containers between hosts if needed |
| Fast Deployment | Spin up new services in minutes |
| Clean Removal | Delete a container without affecting others |
LXC vs VMs: The Right Choice for Homelab
I chose LXC containers over full VMs because:
- Lower overhead: Containers share the kernel, using less resources
- Faster startup: Containers boot in seconds, not minutes
- Better density: Run more services on the same hardware
- Still isolated: Each container is separate and secure
📊 Current Setup Overview
Here’s what my homelab currently runs:
Proxmox Host (Mini PC)
├── LXC: Caddy (Reverse Proxy)
├── LXC: Pi-hole (DNS + Ad Blocking)
├── LXC: Service 1 (Debian + Docker Compose)
├── LXC: Service 2 (Debian + Docker Compose)
└── LXC: Service N (Debian + Docker Compose)
Each service container follows a pattern:
- Base: Debian LXC container
- Docker: Docker and Docker Compose installed
- Service: Application running via
docker-compose.yml - Backup: Proxmox snapshots for recovery
🚀 What’s Next: The Evolution Roadmap
The evolution is far from complete. I have many projects in progress and planned:
In Progress
- SSO Implementation: Logging into each service manually is unnecessary and annoying
- Network Revolution: Two fundamental purchases that transformed my network setup
- CGNAT Solution: Overcoming Starlink’s CGNAT limitations
Planned
- Kubernetes Cluster: Creating a K8s cluster based on Talos Linux VMs
- Infrastructure as Code: Transforming the entire infrastructure into IaC (Infrastructure as Code)
I didn’t want to make this article too long, so I’ll dive deeper into each of these topics in future posts.
💡 Key Lessons Learned
After years of failures and finally building something that works, here are my main takeaways:
1. Start with a Solid Foundation
Don’t use:
- ❌ Desktop Linux for server purposes
- ❌ Installing everything directly on the OS
Do use:
- ✅ Proper hypervisor (Proxmox, ESXi, etc.)
- ✅ Containerization from day one
2. Embrace Containerization
Whether it’s LXC, Docker, or both — containers solve so many problems:
- Version conflicts? Isolated.
- System updates breaking apps? Snapshots.
- Need to test something? Clone a container.
- Want to remove something? Delete the container.
3. Invest in Network Fundamentals
Setting up proper DNS and reverse proxy from the start changed everything:
Before: http://192.168.1.47:8096
After:  https://outline.home.local
This small change makes the homelab actually pleasant to use.
4. Don’t Overcomplicate Initially
I started simple:
- Proxmox installation
- Two core LXC containers (Caddy + Pi-hole)
- Additional services as LXC containers
Then I evolved from there. Trying to build everything at once leads to abandonment.
🛠️ Practical Tips for Your Homelab
If you’re starting your own homelab journey, here’s what I wish I had known:
Hardware Requirements
You don’t need much to start:
- Mini PC or old desktop: 4GB RAM minimum, 8GB+ recommended
- SSD storage: Even a small SSD makes a huge difference
- Wired network: Absolutely essential for Proxmox
- Static IP: Configure DHCP reservation for your Proxmox host
Initial Setup Checklist
- Install Proxmox on bare metal
- Configure networking properly from the start
- Set up Pi-hole as your first LXC container
- Configure DNS in your router to point to Pi-hole
- Deploy Caddy (or Nginx Proxy Manager) for reverse proxy
- Create template LXC containers for easy cloning
- Set up backups immediately
Resource Allocation
For LXC containers, I typically use:
- Pi-hole: 512MB RAM, 1 CPU core
- Caddy: 512MB RAM, 1 CPU core
- Service containers: 1-2GB RAM, 2 CPU cores (depends on the service)
The beauty of LXC: you can adjust these on the fly!
🔒 Considerations
My approach:
- Proxmox snapshots: Before any major changes
- Weekly backups: Automatic backup to external storage
- Off-site backup: Critical data replicated off-site
- Test restores: Regularly verify backups actually work
📈 The Results: A Working Homelab
After all this work, I finally have what I wanted:
| Metric | Before (Ubuntu Desktop) | After (Proxmox + LXC) |
|---|---|---|
| Stability | Days before issues | Months without problems |
| Deployment Time | Hours of manual work | Minutes with cloning |
| Maintenance | Constant firefighting | Scheduled updates |
| Scalability | Impossible | Easy to add services |
| Recovery | Reinstall everything | Restore from snapshot |
| Usability | IP:port nightmare | Clean FQDNs |
🎬 Conclusion
Building a homelab isn’t about having the latest hardware or the most complex setup.
It’s about:
- Having a clear strategy before you start
- Using the right tools for your needs (Proxmox, containers, proper networking)
- Starting simple and evolving gradually
- Learning from failures (I had many!)
My homelab journey went from chaos to stability not because I got better hardware, but because I finally understood the importance of proper architecture and containerization.
If you’re struggling with your homelab, take a step back and ask:
- Am I using proper virtualization/containerization?
- Is my network setup making things harder than necessary?
- Am I trying to do too much at once?
Sometimes the answer is to tear it all down and rebuild with a better foundation. That’s what I did, and it finally worked.
📚 Resources
- Proxmox VE Documentation — Complete guide to Proxmox
- Pi-hole — Network-wide ad blocking
- Caddy Server — Simple reverse proxy with automatic HTTPS
- LXC Linux Containers — Understanding LXC
- Proxmox Helper Scripts — Community scripts for quick deployments
- r/homelab — Active community for homelab enthusiasts
🔮 Coming Soon
In future articles, I’ll dive deeper into:
- Setting up SSO for seamless authentication across all services
- Network improvements with specific hardware recommendations
- Solving CGNAT issues with Starlink
- Building a Talos Kubernetes cluster on Proxmox
- Infrastructure as Code for the entire homelab setup
Stay tuned for more homelab adventures!
Thanks for reading! If you have questions about homelabs, Proxmox, or want to share your own homelab journey, feel free to reach out.
Related Articles
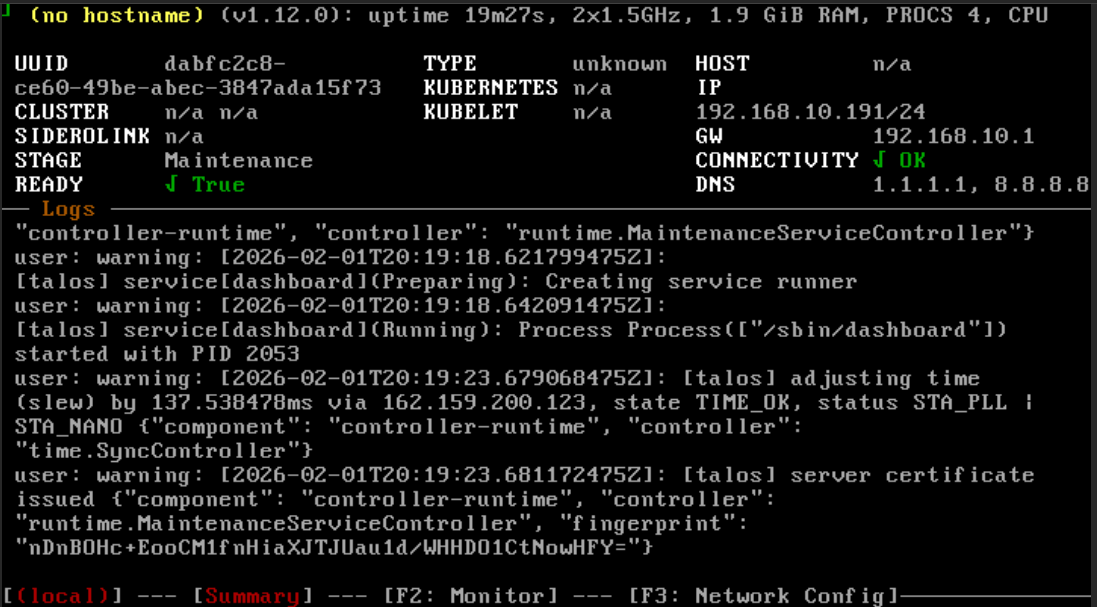
Installing Talos Kubernetes on Proxmox: A Complete Guide
February 1, 2026
Learn why Talos is the best OS for running Kubernetes, how it compares to alternatives, and follow a complete guide to setting up a production-grade cluster with Cilium CNI on Proxmox.

Self-Hosted GitHub Actions Runners: When Free Minutes Run Out
December 1, 2025
Running out of free GitHub Actions minutes? Here's how to set up your own self-hosted runner for unlimited CI/CD workflows.
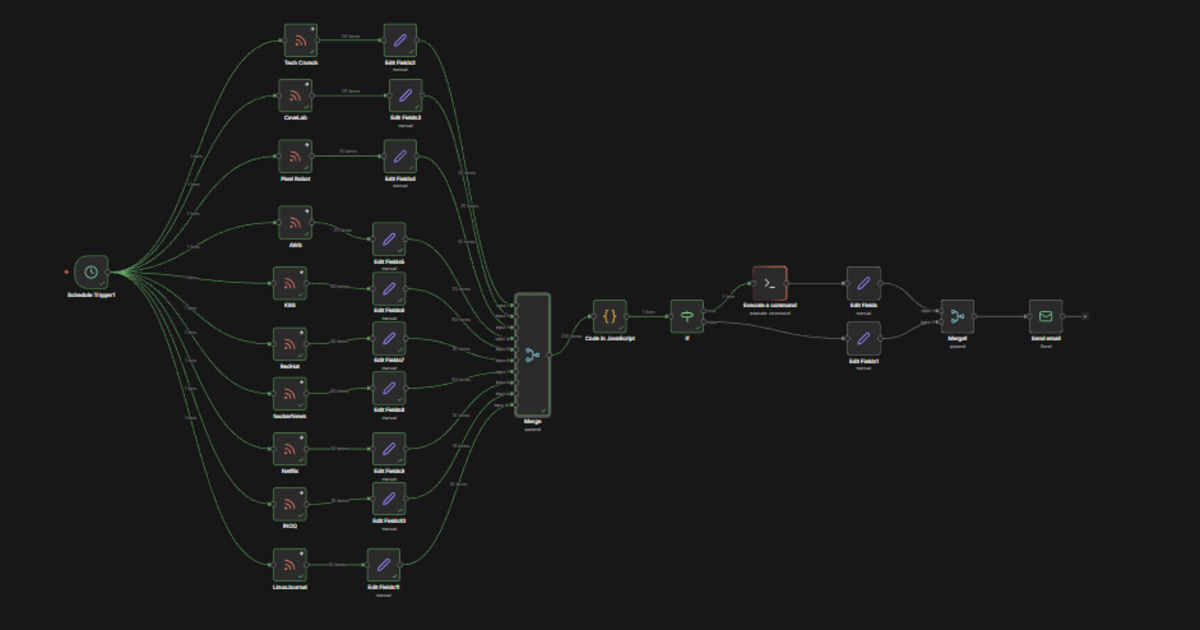
Automating My Daily Tech News: N8N, RSS Feeds, and GitHub Copilot CLI
January 2, 2026
How I built an automated system to collect, summarize, and deliver tech news daily using N8N workflows, RSS feeds, and GitHub Copilot CLI - cutting through the noise to stay informed without it becoming a second job.
Contact Me
Have questions or want to collaborate? Send me a message!